Friday, May 29, 2009

Changing your Start Menu Name

I have always wanted to play with this but hadn't ever really taken the time but I found a great link from here,

Basically they step through and explain how to change your menu, using a hex editor, it is pretty neat,
(Hex editor can be found here
The steps are:
1. Make a backup of your explorer.exe (located at C:\Windows) called explorer.sav
2. Make a "working copy" of the explorer.exe called explorer.bak
3. Make changes to explorer.bak (initial location can be found by searching for the string 05 00 53 00, as well as 05 00 73 00, (one for Start and one for start).
4. Then you would have to reboot into command line and then copy over the explorer.bak to the explorer.exe, this is where I would deviate.

Onaclov's Alternate Steps:
Simply open a command prompt and navigate to C:\Windows>.

Next, Open your task manager (control alt delete, sometimes it will bring it up or sometimes it will bring up a little window that you can simply click on the button).
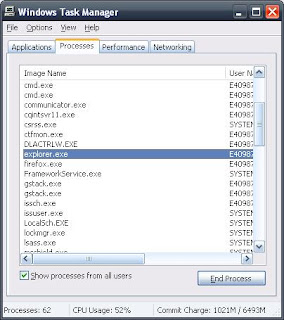
Next, click on the processes tab and look for the explorer.exe processes, you can sort by clicking on
image name at the top.

Next, you just right click and select end process (This is of course provided you aren't doing anything "critical" with your system that you need explorer.exe),

Next, just copy the file over using the command prompt like the linked tutorial says. (If you find your window disappeared just try doing an ALT + TAB and it will bring up a list of all the windows (or you can switch to in your task manager)

Finally you would just click on the Applications Tab in the Task Manager, and select New Task, and type in explorer, it should start up, and you'll see your start bar, and there you are with your fancy new start menu.

I would say once you know how to do the above steps it takes like maybe 15 seconds to do all of it, which is MUCH faster then shutting down your machine and restarting just to see a small change.


Continuing from my little deviation:
I changed mine to my name, the only problem I have is that when I saved it I tried to find it again, that wasn't nearly as easy, fortunately I am a bit of a troubleshooter.... so here's a tip.

Opening up your "saved" explorer, you can look for the two locations (in my case I have XP),
1. 000f5ae0h Start
2. 000f64b0h start

Those are the two addresses that I found my numbers at, so now in your "modified" explorer.bak, just open it up and find that address and right in that area you should see your modified start name, make any changes you would like and follow the tip I gave to check out the results.

This tip is great because you can make changes and take a look and then jump right back to it without having to know the hex code you changed it to.

Good luck and let me know how it works out.

Links back:
http://www.chmaas.handshake.de/delphi/freeware/xvi32/xvi32.htm
http://mirror.href.com/thestarman/hack/HackStart.htm

Thursday, May 28, 2009

Windows Selected Filenames

For the longest time I could be in a folder and want to figure out a way to add a set of selected filenames to the clipboard, this might sound easier then it really is, here's my journey.

There are/were 3 barriers for me:
1. I don't know the Windows API verywell, so I can't do it that way (yet)
2. I can't pass multiple filenames to a program (again falling into the "api" factor)
3. Because of # 2, I can't clear the clipboard and then add the item because when the script is ran it will only add the passed in parameter to the clipboard, and since I haven't figured out how to pass multiple filenames via parameters, so we'll have whatever was IN the clipboard remain.

I decided that perl might be a fun way to do this, here is my plan of attack,
1. Create a perl script that takes whatever is passed to it, and adds it to the clipboard (a.k.a appends it).
2. Add this item to the right click menu (similar to the way we added the command line prompts)

Let's get started.

Here is the code I'm using and I'll explain it line by line after:
#! perl use WIN32::CLIPBOARD;
$CLIP = Win32::Clipboard();

@sp = split(/\\/, $ARGV[0]);
$text = $CLIP->Get();
$string = $sp[@sp-1];
$text = $text . "\n" . $string;
$CLIP->Set($text);

First we declare:
use WIN32::CLIPBOARD;

This is so we can use Windows Clipboard functions

Next is
$CLIP = Win32::Clipboard();
Here we setup the $clip as a clipboard object.

Next,
@sp = split(/\\/, $ARGV[0]);

Here we split the passed in parameter (windows passes the entire path to the filename)
up by the \ character.

Next,
$text = $CLIP->Get();
We go get the contents of the clipboard

Next,
$string = $sp[@sp-1];
Here we store off the last item of the split up array which happens to be the filename only, no path.

Next,
$text = $text . "\n" . $string;
Here we append the filename to the original clipboard contents.

Finally
$CLIP->Set($text);
This is the last line, and all it does is take the text string we created by appending our filename to the original contents, and sets it to the clipboard.

Now what I have been doing is starting a folder on my C drive called batch that I stick all my context menu executable items.

Finally we'll follow the steps outlined in Command Prompt to add the selection to a folder
1. Open an explorer window, this can be accomplished by either pressing "Windows key + E" or just opening a folder.
2. Select Tools Folder Options,
3. Click the Tab File Types
4. Select Folder
5. Select Advanced
6. Select New
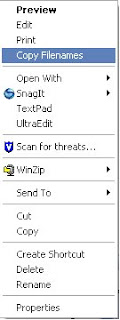
7. For Action name, Just name it something you'll remember like "Copy Filenames"
8. For the application used to perform this action enter the path to your perl script you created above
9. Select Ok's to exit.
10. Try it out, now go to a folder and right click on it and select whatever you named your action.

Now in order to see it show up on ALL files, you will need to do a bit of Registry editing,
Here's the steps:
1. Windows key + r (Or just get to the run dialog using start then run)
2. type in regedit and hit enter
3. Save your current registry (in case you mess up) by using export under the file menu.
4. Navigate to HKEY_CLASSES_ROOT
5. The first entry is *,expand this
6. If there is a folder called shell expand it, if not you can create one by right clicking on the * folder and selecting New then Key, make sure to name it shell.
7. On the shell folder right click and select New then Key, Name it whatever you called your action in the previous step for folders.
8. On the folder you just created add a new key once more and call it command.
9. Now in the right side of the window edit the (default) item by double clicking on it,
10. Enter in cmd /c %1
(Mine looks like this:
cmd /c c:\batch\filelisting_selection.pl %1)
11. Click ok, and you have updated your registry


Try it out now!

Limitations:
1. If you select LOTS of items and try to add it, you could run into problems because windows will have to start one instance for each file, this works great for 0-20ish files, once you start getting higher, windows will ask you if you're sure that you want to do this.

2. Also I have run into the problem if I have a folder selected AND a file selected the tool will only add one or the other to the clipboard, haven't quite figured that one out either.


If you have any other ideas on how to implement this let me know, I couldn't seem to find this anywhere on the net but who knows, maybe someone has posted it somewhere, and I have yet to find it, either way leave a comment and let me know how it works.

UPDATE:
No sooner then after having this little "trick" in my bag for a couple months and FINALLY posting about it, do I find an alternate way to do this that might work alot better, it won't open numerous instances of the program so it'll be alot quicker. I'll post an "updated" post in the near future once i work all the bugs out.

UPDATE II:You can now check it out here

Wednesday, May 27, 2009

Server Part 1

This will be a multipart post on setting up my Media/Web server.

Today's post will contain details on prepping for the actual installation.

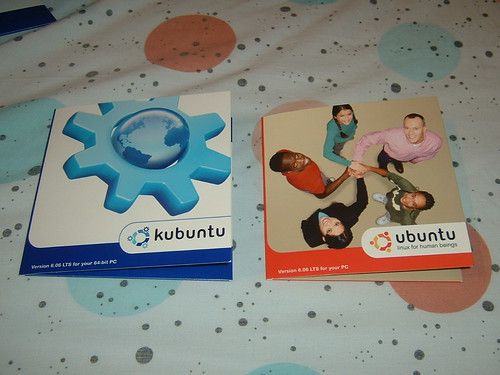
First I downloaded the KDE (I have been fond of KDE lately), Ubuntu flavor called Kubuntu you can find it here: Kubuntu Live CD On the left hand side it has the option to download. Once you have the ISO downloaded, burn it as an Image to a disc.

Then setup your computer to boot to CD first, then boot into your linux.

Second I plugged in all my drives I planned on using into my server and formatted them, I used this page as a reference Ehow Format a Hard Drive in Linux

**Note Formatting will destroy all data on a disk, I didn't try it but I imagine that re-partitioning could potentially cause problems as well, so make sure your data is all backed up on a drive you aren't formatting or re-partitioning.

First open a terminal.

First I deleted all the partitions using fdisk, then created a new partition (only one partition per disc for my setup is what I decided), I setup the partition type (I simply followed the instructions on the linked page and used EXT2).

Here's the commands I used:
sudo fdisk -l

This will give you a listing of all the drives attached as well as partitions,
You'll note that some drives will show /dev/hdx, and some will show /dev/sdx, depending on the number of drives you have installed, in my case I have 3 drives so I'll be doing the follwing steps 3 times one for each in my case I had /dev/sda, /sdb, and /sdc.

I started with /dev/sda so my next command was:
sudo fdisk /dev/sda


This starts up fdisk and tells it we are working on the sda drive.
Depending on how many partitions you have you may need to take a few steps here, but in my case I only had one partition so I simply typed d and hit enter and it deleted my only partition, if you have multiple partitions you would be asked which partition to do, once you are down to one partition it won't ask anymore it assumes that it is supposed to delete the last partition.

Next I typed n, after this fdisk will ask you what kind of partition this is, In my case it's a primary partition, so I typed p, After that I simply left the defaults, here you can setup the size of your partition, if you plan on using multiple partitions, then you would specify the sizes you would like, but since i only want one partition I just left them all default by hitting enter at each prompt.

Next we'll setup what kind of partition this will be, type a t, now it will ask you what kind, I used 83, This is a standard linux partition, there are other ones such as ext3, ntfs, fat16 etc, these can be shown by typing an L, if for some reason you don't want to use 83, just type the number of the partition type you do want.

Finally we'll write the partition out, by typing a w this will write out all our changes to the disk, up until this point you can cancel what you had done by just backing out, but now you've written
to the disk and things are final,

Next we'll Make the file system using mkfs.

our next command will be
sudo mkfs -t ext2 /dev/sda1

What we're doing is running the tool mkfs (which I believe stands for make filesystem), and telling it that the type (-t) is ext2 and telling it which drive to do it to, since I only have one partition I would use /dev/sda1, if you have multiple partitions you would use your applicable one in this case as well. Also if you used a different filesystem then ext2 you would specify it as well.

This will take a little while depending on the size of your drive, my 250GB drive didn't take too long, maybe 5-10 minutes.

Finally we are ready to format our drive using the command:
sudo fsck -f -y /dev/sda1

What this commad does is run File System Check the option -y will attempt to fix any problems (info found here).

What -f means is that it does a "fast check", if you have had disk problems in the past you may want to leave this off and let it do a thourough check. (info found here)

Now you just repeat each of the steps for each drive!!!

Tune in when I install the Ubuntu Server Edition!!!

Links used:
http://blog.diyersitzone.net/2009/03/30/how-to-repair-a-corrupted-filesystem-in-ubuntu/
http://manpages.ubuntu.com/manpages/hardy/man8/fsck.8.html
http://www.ehow.com/how_1000631_hard-drive-linux.html
http://www.kubuntu.org/

Sunday, May 17, 2009

Server

So I was working on getting my server up with Ubuntu 9.04 Jaunty Jackalope, Server Edition, it took a little work but so far some of the things I have setup are my SSH logins, my Apache mysql and PHP server, as well as SAMBA, now what I'm working on getting setup is using the Handbrake Command Line Interface, so I'll be able to directly rip a DVD to my server, then tell the Handbrake a list of files to encode to MP4, so I can then stream them to my Xbox 360 as well as load them on my iPod Touch. I'll plan on putting up a "how to" to get through some of the things I went through to get it all up and running, it took some time but now I'm really happy with it, the only thing left with my current configuration is setting up the wifi. Once that's done I shouldn't have much work left.

Follow along as I begin a series of setting up my server.

Monday, May 11, 2009

State Diagrams

I was in my Computer Logic and Design class and was noticing something about figuring out how to setup a sequence recognizer for an equation of the form xk+z, on our last test we had the equation 4k+3, now that just plain had me stumped. Apparently the teacher had gone over a similar problem in class, but either I had not attended that day, or well I think I might have ADD because I don't think I've actually managed to follow along for an entire class ever. Back to the point of the post.

We got the answer guide and I noticed something there were 4 states, the question went something like this:
Create a state diagram of the following equation: 4k+3, for example when you have gotten 3 1's you will output a 1, then when you get 4 more 1's you'll get a 1...so on and so forth

This started a connection, because she showed that we would look at the states as the following,
Zero 1's at 4k + 0, k=0,1,2,3,4... OUTPUT 0
One 1 at 4k + 1, k = 0,1,2,3,4... OUTPUT 0
Two 1's at 4k + 2, k = 0,1,2,3,4... OUTPUT 0
Three 1's at 4k+3, k = 0,1,2,3,4... OUTPUT 1

So I thought to myself well then if you have z (from 4k+z) then you must need z+1 states,
additionally you would get your first 1 on the zth state.

After trying to get the teacher to understand what I was asking (one reason I'm writing this blog is to learn to become better at explaining myself), she finally agreed that my assumptions were correct.

Of course if you use another equation, I'm sure there will be some similar form you can probably find to break it into a when this do this type of situation.

Now the teacher was going over the fact that in some situations you could factor things down and do some other stuff, but you'd have to loop through your State Diagrams more then once, provided we are treating our output as a "mealy" output, we can determine what our next course of action is based on the input and our state, if it's simply a "moore" then we HAVE to use z states, because it only cares what it's previous state was to determine the next state.

I hope that is clear, if not please let me know, I would like to get better at explaining myself and any help is good help at this point!!!

Wednesday, May 6, 2009

Same State People Unite

I don't know if anyone else out there feels the way I do, but I am from North Dakota (yes there are 2 dakotas), and I'm currently living in New Mexico, when I see a car with a North Dakota plate I always feel the urge to want to flag them down and ask them where in ND they're from. I think there needs to be a universal signal to say hey I'm from the same state as you, without having to say anything.

I'm getting excited, we'll be driving up to South Dakota for a trip to see the family for memorial day weekend (We are all camping), not excited for the 10 hour drive but definitely excited to see the family.

Batch Scripts Perl scripts and Bears Oh My!!!

I don't know but maybe I'm the only one who has these problems but I don't know how many times I'll run a batch script and find that it's managed to start run and close before I even saw the screen come up, now of course you can get around this by putting a pause in your script, but honestly I don't always want to pause I just want to see that it successfully completed and not wait for me to hit enter.

One way to work around this is by following this steps:

Purpose: The point of this is to make the window stay open when you run a batch file.
  1. Windows Key + R
  2. type regedit in the window
  3. Back up Registry
    1. File
    2. Export>
    3. Save somewhere you can find it in case you need to revert
  4. Click the Plus sign next to HKEY_CLASSES_ROOT
  5. scroll to batfile
  6. Click the little plus next to it
  7. Click the little plus next to shell
  8. Click the little plus next to open
  9. Click the folder command
  10. For the REG_SZ on the right window double click the (Default)
  11. Make sure the string looks like this:
    • "cmd.exe" /k "%1" %*


Now to explain, what I have set it to do is to basically keep the window open after running so you are returned to a command prompt.

Another place I find this to be very helpful is for example if you're using perl scripts right?

How many times do you run a perl script (to test) just by double clicking on it, and it opens calls an error and closes before you get a chance to even look at it?

Almost all the same steps as you'll see:
  1. Windows Key + R
  2. type regedit in the window
  3. Back up Registry
    1. File
    2. Export>
    3. Save somewhere you can find it in case you need to revert
  4. Click the Plus sign next to HKEY_CLASSES_ROOT
  5. scroll to Perl
  6. Click the little plus next to it
  7. Click the little plus next to shell
  8. Click the little plus next to open
  9. Click the folder command
  10. For the REG_SZ on the right window double click the (Default)
  11. Make sure the string looks like this:
    • "cmd.exe" /k "perl %1" %*
Of course yours may have looked a little different BEFORE but in order to enable the window to stay open when you run the script you basically use the same thing what we're saying is open a command prompt (and stay open), /k says "run the following command" which happens to be the perl %1 and as a reminder the %1 is a parameter passing in what was called to it.

The beauty of this is it can be applied to almost any script/exe etc. additionally you could add other arguments, for example if you want your perl scripts to always run in "debug" mode to give you the most information when you run a script (in case it fails) that would be a -w right in front of the %1:
  • "cmd.exe" /k "perl -w %1" %*
I hope you enjoyed and let me know how it works for you!!!

Tuesday, May 5, 2009

Command Prompt

I frequently find myself needing access to the command prompt when I'm inside a folder, one of the ways I do that is:
1. Click start
2. Click Run (or alternately to get to this Windows Key +R)
3. Type cmd
4. Then Type cd
5. Then drag the folder of the location I want into this window
6. Hit enter (ok so not literally, I didn't hit it)
Today, I'm going to introduce how to use the right click menu to make life easier for those (in windows) to be able to jump to command line pretty easily,

1. Open an explorer window, this can be accomplished by either pressing "Windows key + E" or just opening a folder.
2. Select Tools Folder Options,
3. Click the Tab File Types
4. Select Folder
5. Select Advanced
6. Select New
7. For Action name, Just name it something you'll remember like "command prompt"
8. For the application used to perform this action enter cmd.exe /K cd %1
9. Select Ok's to exit.
10. Try it out, now go to a folder and right click on it and select whatever you named your action.

Time to explain what I had you put in the application used to perform.
cmd.exe opens your command prompt, /K means "run the following" and the following is cd %1, cd means change directory, and %1 means what was passed to the command in this case the folder location (I.E. c:\New Folder).

I hope this helps some people out there, let me know how it works for those of you who try it!!!

Thank you for reading my first "real" post.

Monday, May 4, 2009

In the beginning

Greetings,
First, let me introduce myself. My Name is Tyson Bailey, I have always had an interest in all things Computer/Electronics, Cooking, Photography, and Cars, I'm sure there are more but I can't seem to think of any.

Some of my favorite sites are
Lifehacker
The Simple Dollar
Slick Deals
Amazon's Goldbox
Woot

The purpose of this site is to improve my writing on more technical related matters, I will be writing on various topics, including my schooling, ideas I have in general, and projects I am/have and want to work on.

I hope you find what I have to say interesting and I'll try to keep the content fresh and updated, hopefully providing an enjoyable experience for you the reader.

Thank you,

Tyson