Showing posts with label windows. Show all posts

Friday, July 16, 2010

Setting up my Workspace

I have found that when I have to go to a new computer for work purposes, I have to re-setup a bunch of stuff. I also have scripts that I may have setup that point to drives by letter, maybe not always the best plan, but well I just get used to having things the same way. 

What ways do you achieve having the same desktop stuff setup when you move from computer to computer.

Here are a few of mine:

1. Setting up Shared Drives:

net use /PERSISTENT:yes U: \\drive1\folder
net use /PERSISTENT:yes V: \\drive2\folder
net use /PERSISTENT:yes Y: \\drive3\folder
net use /PERSISTENT:yes Z: \\drive4\folder
2. Registry updates to explorer menu.

3. I make shortcuts and save them on a shared folder on my computer, then just copy them to the desktop if needed.

I have more but they are very specific to where I work so they aren't too applicable to others here. Do you have any other ideas?

Of course these are specific to Windows XP in my case, but heck give me what you have for linux, apple, AND windows.


[Update]
Caleb says.... Remote Desktop..... <- Good call I forgot about that all together, in my case that doesn't really work as well, but for many this is a great solution.

Wednesday, July 8, 2009

File Organization

With the recent announcement of Google Chrome OS, I thought it fitting talk about one particular topic that I have had problems with.

Computer organization is a tough topic, everyone has their own way and alot of times they work for them, but there is a good majority of people that just can't seem to keep their computers organized, files everywhere, just a plain old mess.

Last night I was thinking about Google and their quest to change email, I avoided the Gmail labels for the longest time because I didn't understand them, finally after reading the reason behind them I understood, it just plain makes sense. Now that I understand them I question why we don't use them for more things. Heck why not use them to organize your computer.

(Their theory is that emails can have more then one purpose so sticking them in ONE folder limits them, by allowing multiple labels on files then it's kinda like having that email in 4 folders but only one copy, easier to deal with and handle)

Here's my theory,
1. ALL files go into a single folder.
2. Keyword Label ALL files, when you create a file, simply add "keyword" options, in the dialog box.
3. Now setup that or another folder to look at all files, but give the option to sort on keywords or even search on keywords, you can have more then one file named the same and behind the scenes the system will handle which file correlates to what kind of data, based on the keywords.

This way as you get files you keyword them and can find them later.

Even better ALL your files are in one place (much like the *nix way of doing things and keeping everything in the home folder).

So lets say you search on the keyword "Cars"

Now you may have photos that have been tagged cars, you may have documents tagged cars and videos...etc, and now you see things as a group, so finding what you need as well as related material would be a breeze.


Now I have tried organizing my files in a couple manners, one was saying ALL files were either Text, Music, Movies, Pictures.

That can sort of work but I had problems having numerous files in the text folder and without creating sub folders it was hard to keep track.

Plus finding documents that correlate to the pictures/videos/etc. makes it tough.

What are some better ways to organize files/folders?

Should folders exists anymore?

What do you think? Let me know in the comments.

Tuesday, July 7, 2009

Perl scripting


So I was checking out Daniweb and trying to answer some questions, and I came across this one:
Sort Files by Date

Since I'm slowly learning perl, I thought why not try:
@someData = `command`;

I tried ls -t which happens to be the unix command to list the directory contents in time order.
After some searching for information for a bit about dir so we can see if this works on windows, I found out you can use the dir /od command instead.
From MSDN

Here's the tidbit of code:

@x = `ls -t`;

foreach $x (@x)
{
print $x;
}
$asdf = <>;

The @x holds the return output from the command and the ls -t can be substituted for dir /od on a windows computer.

I then printed each line, which of course can be redirected to a file, or however you wish to use it for handling.

The $asdf = <>; serves as a "pause" in the script so the script doesn't start run and close before you can see anything.

Let me know in the comments if you can run ls -t from your windows computer standard using perl...

Sunday, June 14, 2009

Random Post: "Handbrake Perl Script"


I have Google Analytics setup on my blog and I can see the keywords that have actually brought people to my site.... I find this interesting and this inspires me...If it's obscure, why not try to "guess" what the person was searching for and then do a post on that subject, if it's pretty straight forward,why not solve it..
Today's keyword subject is : perl script handbrake windows

This one doesn't look too bad.

Per Handbrake.fr's site:
HandBrake is an open-sourced, GPL-Licensed,multiplatform, multithreaded, video transcoder, available for Mac OS X, Linux, and Windows
Looking at the documentation on handbrake's site, there is a command line interface, so we can use that to make any calls to the handbrake program.

The basic command we are going to use would be:
HandBrakeCLI -i source -o destination
So we can immediately start with a perl script like this:
$source = "sourcefile";
$destination = $source . "_converted";
print `HandBrakeCLI -i $source -o $destination`;

This will simply take whatever specified source file we have and output to the destination location.

But if that was all we wanted to do we wouldn't need a perl script would we?

How about if we have a list of files in a document (along with paths)?

We can open that document grab all the paths then simply do a mass conversion!

The final "guess" would simply grab all files of extension x and convert them and dump them in a folder. Again this isn't hard as well.

Lets start with this one, it shouldn't be too bad, of course we'll want to do some error checking, such as if we already have a converted filename of the same type then we definitely want to hold off on converting.
Regardless let's see what we can come up with real quick!
@file_list = <*.mpg *.avi *.vob>;
@converted_list = <*.mp4>;
$extension = ".mp4";
Here we are grabbing a list of all the files we might want to convert, note that you can update that list to contain whatever extensions you might have/like to use. We also grab the list of converted files in there just to do some error checking (in case you leave all your files in the same folder), also the output type should match the type of files you are trying to convert to. We also should define our extension for later use!

Now it's a matter of rolling through each item in the filelist, so we'll start a for loop:
foreach $file (@file_list)
{
@filename = split(/./, $file);
$exists = 0;
}
Something to note is that we want to do a search on the filename in the converted files so in order to do that we'll need to break up the filename from the extension.

Now inside this loop we'll want to do a quick check to see if the file we have a handle on is already listed
foreach $converted (@converted_files)
{
if ($converted =~ m/@filename[0]/i)
{
$exists = 1;
}
$baseName = @filename[0];
}
So now we've done a check and if we have a file that our converted files contains.

What we can now do is make an if/then that will basically skip the file altogether if we see that $exists contains a 1!
if ($exists == 1)
{
print "File already converted!!";
}
else
{
$source = "$file";
$destination = $baseName . "_converted" . $extension;
print `HandBrakeCLI -i $source -o $destination`;

}
Something to remember:
If you want to save to a separate folder I would recommend doing a check for whether that folder exists rather then grabbing a list of files in the current directory.
Entire Script (small text...just copy paste):
@file_list = <*.mpg *.avi *.vob *.AVI>;
@converted_list = <*.mp4>;
$extension = ".mp4";


foreach $file (@file_list)
{
@filename = split(/\./, $file);
$exists = 0;

foreach $converted (@converted_list)
{
if ($converted =~ m/@filename[0]/i)
{
$exists = 1;

}
$baseName = @filename[0];
print @filename[0] . "\n";
}

if ($exists == 1)
{
print "File already converted!!";
}
else
{
print "Converting";
$source = "$file";
$destination = $baseName . "_converted" . $extension;
print "Ready?\n";
$asdf = <>;
print `HandBrakeCLI -i $source -o $destination`;
}
}

The only difference between the above script and one that will open a document and pull all the filenames from it is that you would use the command:

open DATAFILE, "$inputfilename" or die "Missing $inputfilename file.\n"; open (DATAFILE, $inputfilename);
@file_list = ;
close (DATAFILE);
The above would replace the line:
@file_list = <*.mpg *.avi *.vob>;
That's really the only difference!

Well let me know what you think in the comments and if you happen to have found this site looking for just this random post please let me know!!!

Monday, June 8, 2009

Windows Selected Filenames Pt II

Welcome back, well as we all know, in the words of my good friend Phil:
"But with all programming/design problems – there are a multitude of unique methods that may be employed to removed the dermal layer of the felinus domesticus"
If you don't know how to setup a "right click" menu item for files and folders I would recommend checking out the following posts: Windows Selected Filenames, Command Prompt

Lets get on with it, This "version" of the selected filenames will use the same steps to get it up and running, (right click menu), but the only difference is that now when we have our script setup we'll copy the files to the clipboard, then deslect the files and right click on a single filename and select your copy filenames script, Lets get into the meat of this script,

#! perl
use WIN32::CLIPBOARD;

$text = "";
$CLIP = Win32::Clipboard();

if ($CLIP->IsFiles())

{

@files = $CLIP->GetFiles();

foreach $file (@files)

{
@sp = split(/\\/, $file);

$text = $text .$sp[@sp-1] . "\n";
}
$CLIP->Set($text);

}
Breaking it down again:

First we declare:
use WIN32::CLIPBOARD;
This is so we can use Windows Clipboard functions

Next is
$text = "";
We want a clean text string.

Then,
$CLIP = Win32::Clipboard();
Here we setup the $clip as a clipboard object.

Next,
if ($CLIP->IsFiles())
What this is doing is checking that there are "files" in the clipboard, we want this because otherwise we'll try to write "nothing" to the clipboard and I'm sure that's not a problem, but if for some reason you really didn't mean to do this and you already had text in the clipboard then it won't overwrite your text clipboard contents, either way it won't write to the clipboard if you don't have any files in the clipboard, you can remove this if you want but I haven't tested it out, it may work just fine.

Then,
@files = $CLIP->GetFiles();
This chunk of code goes out and gets the files in the clipboard, and stores them in an array.

Next,
foreach $file (@files)
So what we're going to do is run the next couple of lines for each file (or in this case we'll be grabbing the filename)

Then,
@sp = split(/\\/, $file);
This line splits the "filename" up into segments if you were interested in the whole pathname you could omit this step and just assign the $text variable to whatever $text contained and the $file variable plus "\n", so you get each filename on a new line.

Next,
$text = $text .$sp[@sp-1] . "\n";
This takes the split up line above and grabs the last bit of it, which happens to be the actual filename. Remember if you wanted the entire pathname you could use the $file variable like so,
$text = $text . $file . "\n";

Finally,
$CLIP->Set($text);
This line sets your newly created text to the clipboard!

Give it a try and let me know how it works out for you!

I'm sure this isn't the last post about this subject, as always things are always improving, I am constantly thinking of a way to cut back on the amount of steps to run this little "tool" my plan is to eventually "simulate" the keystroke to "copy" the files then copy the filenames, not sure how to go about it, without running multiple instances, I'm sure hotkeys will be a big help on this, either way I'll be improving this script again in the future...Stay tuned I'm certain there will be more posts on getting this working better.

Friday, May 29, 2009

Changing your Start Menu Name

I have always wanted to play with this but hadn't ever really taken the time but I found a great link from here,

Basically they step through and explain how to change your menu, using a hex editor, it is pretty neat,
(Hex editor can be found here
The steps are:
1. Make a backup of your explorer.exe (located at C:\Windows) called explorer.sav
2. Make a "working copy" of the explorer.exe called explorer.bak
3. Make changes to explorer.bak (initial location can be found by searching for the string 05 00 53 00, as well as 05 00 73 00, (one for Start and one for start).
4. Then you would have to reboot into command line and then copy over the explorer.bak to the explorer.exe, this is where I would deviate.

Onaclov's Alternate Steps:
Simply open a command prompt and navigate to C:\Windows>.

Next, Open your task manager (control alt delete, sometimes it will bring it up or sometimes it will bring up a little window that you can simply click on the button).

Next, click on the processes tab and look for the explorer.exe processes, you can sort by clicking on
image name at the top.

Next, you just right click and select end process (This is of course provided you aren't doing anything "critical" with your system that you need explorer.exe),

Next, just copy the file over using the command prompt like the linked tutorial says. (If you find your window disappeared just try doing an ALT + TAB and it will bring up a list of all the windows (or you can switch to in your task manager)

Finally you would just click on the Applications Tab in the Task Manager, and select New Task, and type in explorer, it should start up, and you'll see your start bar, and there you are with your fancy new start menu.

I would say once you know how to do the above steps it takes like maybe 15 seconds to do all of it, which is MUCH faster then shutting down your machine and restarting just to see a small change.


Continuing from my little deviation:
I changed mine to my name, the only problem I have is that when I saved it I tried to find it again, that wasn't nearly as easy, fortunately I am a bit of a troubleshooter.... so here's a tip.

Opening up your "saved" explorer, you can look for the two locations (in my case I have XP),
1. 000f5ae0h Start
2. 000f64b0h start

Those are the two addresses that I found my numbers at, so now in your "modified" explorer.bak, just open it up and find that address and right in that area you should see your modified start name, make any changes you would like and follow the tip I gave to check out the results.

This tip is great because you can make changes and take a look and then jump right back to it without having to know the hex code you changed it to.

Good luck and let me know how it works out.

Links back:
http://www.chmaas.handshake.de/delphi/freeware/xvi32/xvi32.htm
http://mirror.href.com/thestarman/hack/HackStart.htm

Thursday, May 28, 2009

Windows Selected Filenames

For the longest time I could be in a folder and want to figure out a way to add a set of selected filenames to the clipboard, this might sound easier then it really is, here's my journey.

There are/were 3 barriers for me:
1. I don't know the Windows API verywell, so I can't do it that way (yet)
2. I can't pass multiple filenames to a program (again falling into the "api" factor)
3. Because of # 2, I can't clear the clipboard and then add the item because when the script is ran it will only add the passed in parameter to the clipboard, and since I haven't figured out how to pass multiple filenames via parameters, so we'll have whatever was IN the clipboard remain.

I decided that perl might be a fun way to do this, here is my plan of attack,
1. Create a perl script that takes whatever is passed to it, and adds it to the clipboard (a.k.a appends it).
2. Add this item to the right click menu (similar to the way we added the command line prompts)

Let's get started.

Here is the code I'm using and I'll explain it line by line after:
#! perl use WIN32::CLIPBOARD;
$CLIP = Win32::Clipboard();

@sp = split(/\\/, $ARGV[0]);
$text = $CLIP->Get();
$string = $sp[@sp-1];
$text = $text . "\n" . $string;
$CLIP->Set($text);

First we declare:
use WIN32::CLIPBOARD;

This is so we can use Windows Clipboard functions

Next is
$CLIP = Win32::Clipboard();
Here we setup the $clip as a clipboard object.

Next,
@sp = split(/\\/, $ARGV[0]);

Here we split the passed in parameter (windows passes the entire path to the filename)
up by the \ character.

Next,
$text = $CLIP->Get();
We go get the contents of the clipboard

Next,
$string = $sp[@sp-1];
Here we store off the last item of the split up array which happens to be the filename only, no path.

Next,
$text = $text . "\n" . $string;
Here we append the filename to the original clipboard contents.

Finally
$CLIP->Set($text);
This is the last line, and all it does is take the text string we created by appending our filename to the original contents, and sets it to the clipboard.

Now what I have been doing is starting a folder on my C drive called batch that I stick all my context menu executable items.

Finally we'll follow the steps outlined in Command Prompt to add the selection to a folder
1. Open an explorer window, this can be accomplished by either pressing "Windows key + E" or just opening a folder.
2. Select Tools Folder Options,
3. Click the Tab File Types
4. Select Folder
5. Select Advanced
6. Select New
7. For Action name, Just name it something you'll remember like "Copy Filenames"
8. For the application used to perform this action enter the path to your perl script you created above
9. Select Ok's to exit.
10. Try it out, now go to a folder and right click on it and select whatever you named your action.

Now in order to see it show up on ALL files, you will need to do a bit of Registry editing,
Here's the steps:
1. Windows key + r (Or just get to the run dialog using start then run)
2. type in regedit and hit enter
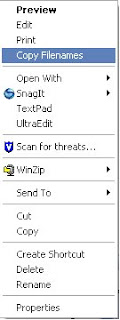
3. Save your current registry (in case you mess up) by using export under the file menu.
4. Navigate to HKEY_CLASSES_ROOT
5. The first entry is *,expand this
6. If there is a folder called shell expand it, if not you can create one by right clicking on the * folder and selecting New then Key, make sure to name it shell.
7. On the shell folder right click and select New then Key, Name it whatever you called your action in the previous step for folders.
8. On the folder you just created add a new key once more and call it command.
9. Now in the right side of the window edit the (default) item by double clicking on it,
10. Enter in cmd /c %1
(Mine looks like this:
cmd /c c:\batch\filelisting_selection.pl %1)
11. Click ok, and you have updated your registry


Try it out now!

Limitations:
1. If you select LOTS of items and try to add it, you could run into problems because windows will have to start one instance for each file, this works great for 0-20ish files, once you start getting higher, windows will ask you if you're sure that you want to do this.

2. Also I have run into the problem if I have a folder selected AND a file selected the tool will only add one or the other to the clipboard, haven't quite figured that one out either.


If you have any other ideas on how to implement this let me know, I couldn't seem to find this anywhere on the net but who knows, maybe someone has posted it somewhere, and I have yet to find it, either way leave a comment and let me know how it works.

UPDATE:
No sooner then after having this little "trick" in my bag for a couple months and FINALLY posting about it, do I find an alternate way to do this that might work alot better, it won't open numerous instances of the program so it'll be alot quicker. I'll post an "updated" post in the near future once i work all the bugs out.

UPDATE II:You can now check it out here

Wednesday, May 6, 2009

Batch Scripts Perl scripts and Bears Oh My!!!

I don't know but maybe I'm the only one who has these problems but I don't know how many times I'll run a batch script and find that it's managed to start run and close before I even saw the screen come up, now of course you can get around this by putting a pause in your script, but honestly I don't always want to pause I just want to see that it successfully completed and not wait for me to hit enter.

One way to work around this is by following this steps:

Purpose: The point of this is to make the window stay open when you run a batch file.
  1. Windows Key + R
  2. type regedit in the window
  3. Back up Registry
    1. File
    2. Export>
    3. Save somewhere you can find it in case you need to revert
  4. Click the Plus sign next to HKEY_CLASSES_ROOT
  5. scroll to batfile
  6. Click the little plus next to it
  7. Click the little plus next to shell
  8. Click the little plus next to open
  9. Click the folder command
  10. For the REG_SZ on the right window double click the (Default)
  11. Make sure the string looks like this:
    • "cmd.exe" /k "%1" %*


Now to explain, what I have set it to do is to basically keep the window open after running so you are returned to a command prompt.

Another place I find this to be very helpful is for example if you're using perl scripts right?

How many times do you run a perl script (to test) just by double clicking on it, and it opens calls an error and closes before you get a chance to even look at it?

Almost all the same steps as you'll see:
  1. Windows Key + R
  2. type regedit in the window
  3. Back up Registry
    1. File
    2. Export>
    3. Save somewhere you can find it in case you need to revert
  4. Click the Plus sign next to HKEY_CLASSES_ROOT
  5. scroll to Perl
  6. Click the little plus next to it
  7. Click the little plus next to shell
  8. Click the little plus next to open
  9. Click the folder command
  10. For the REG_SZ on the right window double click the (Default)
  11. Make sure the string looks like this:
    • "cmd.exe" /k "perl %1" %*
Of course yours may have looked a little different BEFORE but in order to enable the window to stay open when you run the script you basically use the same thing what we're saying is open a command prompt (and stay open), /k says "run the following command" which happens to be the perl %1 and as a reminder the %1 is a parameter passing in what was called to it.

The beauty of this is it can be applied to almost any script/exe etc. additionally you could add other arguments, for example if you want your perl scripts to always run in "debug" mode to give you the most information when you run a script (in case it fails) that would be a -w right in front of the %1:
  • "cmd.exe" /k "perl -w %1" %*
I hope you enjoyed and let me know how it works for you!!!

Tuesday, May 5, 2009

Command Prompt

I frequently find myself needing access to the command prompt when I'm inside a folder, one of the ways I do that is:
1. Click start
2. Click Run (or alternately to get to this Windows Key +R)
3. Type cmd
4. Then Type cd
5. Then drag the folder of the location I want into this window
6. Hit enter (ok so not literally, I didn't hit it)
Today, I'm going to introduce how to use the right click menu to make life easier for those (in windows) to be able to jump to command line pretty easily,

1. Open an explorer window, this can be accomplished by either pressing "Windows key + E" or just opening a folder.
2. Select Tools Folder Options,
3. Click the Tab File Types
4. Select Folder
5. Select Advanced
6. Select New
7. For Action name, Just name it something you'll remember like "command prompt"
8. For the application used to perform this action enter cmd.exe /K cd %1
9. Select Ok's to exit.
10. Try it out, now go to a folder and right click on it and select whatever you named your action.

Time to explain what I had you put in the application used to perform.
cmd.exe opens your command prompt, /K means "run the following" and the following is cd %1, cd means change directory, and %1 means what was passed to the command in this case the folder location (I.E. c:\New Folder).

I hope this helps some people out there, let me know how it works for those of you who try it!!!

Thank you for reading my first "real" post.